After toying with SmartTarget and Fredhopper for a few weeks, I can tell you from personal experience that it’s bloody complicated. Technically, it’s all nice enough, but there are so many (sub)systems involved and documentation and config files are all over the place.
So I thought it might help people if I explained how to perform some basic tasks. Today, we’ll be creating our own ‘footprint’. In case you don’t know what footprints are, checkout this post.
Quick summary: a footprint is a way for an editor / content manager / marketer to override the claims which are used to determine which personalized content items to show. Oh, and by the way: footprints are available within Experience Manager only!
To create a footprint, you must know which claims are generated in your web application. Let’s assume there is a claim called taf:claim:audiencemanager:contact:extendeddetail:ownedproduct. This claim contains the product which the web site visitor owns. How we got this claim in the first place is a different story, one about which I may blog some other time.
With this claim I have created a FredHopper trigger – again, another story. I told you it was complicated! Right now, I will focus on the footprint only – the ability to override the claim with a custom value.
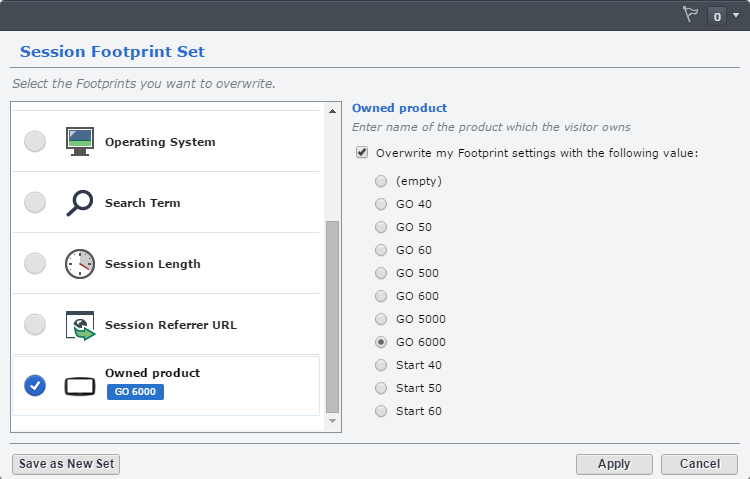
This is how the solution should look:
We can create this in 3 steps:
- Create and upload the icon
- Configure the footprint in XPM
- Tell our web application to allow this claim to be set by XPM
The process is described in detail (although not completely) in the official documentation (login required), but here is the abridged version:
1. The Icon
Although you don’t have to create an icon (if you don’t, there will be a white space instead), they are definitely nice to have. And it’s very easy to do. Just create an icon and save it as PNG in four sizes:
- 16×16
- 24×24
- 32×32
- 48×48
The filenames should be structured like this: <footprintname>.<width>x<height>.png
For this article I will pick ‘footprint.ownedproduct’ as the name of the footprint, so the filenames will be:
- footprint.ownedproduct.16×16.png
- footprint.ownedproduct.24×24.png
- footprint.ownedproduct.32×32.png
- footprint.ownedproduct.48×48.png
Upload these files to <Tridion installation>\web\WebUI\Editors\SiteEdit\Themes\Carbon2\Images\Icons.
2. XPM configuration
Go to the folder <Tridion installation>\web\WebUI\Models\SiteEdit\Configuration and open the file SiteEdit.config (make a backup first!).
The XPM configuration is distributed over two config files, one for the Model and one for the Editor. Settings which related to the data (the claim uri, values, etc) are configured in the model, while the editor configuration determines how the footprint looks.
Look for the ‘footprints’ element and insert a new footprint there.
<footprint ID="ownedProduct" claimUri="taf:claim:audiencemanager:contact:extendeddetail:ownedproduct">
 <title>
 <value lang="1033">Owned product</value>
 </title>
 <description>
 <value>Enter name of the product which the visitor owns</value>
 </description>
 <settings>
 <isMandatory>false</isMandatory>
 </settings>
 <values>
 <value text="">
 <label lang="1033">(empty)</label>
 </value>
 <value text="Product name #1">
 <label lang="1033">Product name #1</label>
 </value>
<value text="Product name #2">
 <label lang="1033">Product name #2</label>
 </value>
 </values>
</footprint>
The most important parts in this config:
- The ID of the footprint (used to connect the model configuration with the configuration of the editor)
- claimUri (this match the claim which holds the ‘owned product’)
- values (the list of accepted values, only applicable if you use a list control to visualize the footprint, more about which later)
Note that the values can be translated into all languages that your GUI supports, by adding labels with different language codes.
On to the next config file, <Tridion installation>\web\WebUI\Editors\SiteEdit\Configuration\SiteEditEditor.config
Look for the ‘footprints’ element and insert a new footprint there. The footprints are shown in the order in which they appear in the editor configuration, so you can determine yourself where you want your footprint to show up in the list.
Add the following XML fragment inside the footprints element:
<footprint ID="ownedProduct" controlID="FootprintRadio" Icon="footprint.ownedproduct" />
- The ID must match the ID used in the model configuration (see above)
- The controlID must be a valid footprint control (you can choose from FootprintDate, FootprintDropDown, FootprintRadio and FootprintText)
- The attribute Icon must contain the part of the filename of your icons which comes before the dimensions (in our example, that would be footprint.ownedproduct)
A bit more about the controlID. If you choose dropdown or radio, you need to specify a number of values in the model configuration (see above). If you choose text or date, you can leave the values element empty.
It is also possible to create your own control. This would be useful if you want to retrieve the values from some source automatically, rather than explicitly including them in the model configuration (as I’ve done here). One feature which is strikingly missing, is a control which loads the values from a category. If any SDL product manager reads this, please consider this my enhancement request for 2015!
To learn more about creating custom controls, see the product documentation.
Finally, restart IIS to activate your changes.
3. Web application
If you follow the official documentation you are now done. And sure enough, you will see the footprint in the preview tab of XPM. However, you can select any value but it will not make a difference. You will always see the same promotions.
The reason is that the Ambient data framework does not allow any ‘outside force’ (which apparently includes SDL’s own Experience Manager) to override the claims. So as a final step, we need to modify the cd_ambient_conf.xml within the web application. Look for an element called GloballyAcceptedClaims, and add the following XML fragment inside this element:
<Claim Uri="taf:claim:audiencemanager:contact:extendeddetail:ownedproduct" />
Restart the web application. Now, you will see different promotions depending on the footprint settings.