UPDATE: you can now run the Tridion deployer in your IDE if you are on Tridion 9 also! Instructions below have been modified to show the differences between SDL Web 8.5 and Tridion 9. Now on to the story.
Whenever you publish a page, component or another type of item in Tridion, the item is first published, then transported and finally deployed. SDL offers various ways to extend or modify this deployment process. All you need to do is write some custom java code. The most commonly used extension points are deployer modules and storage DAOs. You can find more about this here and here.
In this post I’m not going to explain what these extensions are and what you can do with them. Instead, I will focus on how to develop this type of extension effectively. As always with Java (in my experience at least), the code is easy but the environment is hard. But if you follow these instructions, you will be able to run your customizations locally, make sure they get triggered, and even perform step-through debugging on your code. Pure bliss!
Set up the project
First, we need to set up a project. I will assume you are using IntelliJ here. If you use a different IDE, this part of the instruction will be quite a bit different. If you have a project set up already you can skip ahead to the next section, Triggering the deployer from the Tridion CM.
The biggest problem when setting up a deployer project is to get all the dependencies straight. A Tridion 8.5 deployer needs about 160 (!) jar files, some of which are not published to Maven Central. Still, I think dependencies are best managed by Maven. So let’s dig into that first.
Maven dependencies
If we want to run our custom code, we will need to load all the jars the deployer uses as well. If you just want to build a jar (and not run it locally), you don’t need them all, but the point is to give you something that runs in your IDE.
A bit of background is in place here. SDL allows you to split a deployer into 2 parts: a receiver (also known as endpoint), which listens on a certain port to receive the packages sent by the transport service, and a worker, which processes the packages and stores the content in the broker database or on the file system. It is also possible to combine both functions into a single process, called the combined deployer.
To develop your deployer extensions and to run them locally, we only need the worker. The receiver does not contain any customizable components anyway.
The worker needs 126 jars to run. We must therefore add 126 jars to the POM as dependencies. That’s quite a bit of work, since SDL doesn’t distribute a POM for the deployer. Also, 17 out of the 126 jars are not published to a Maven public repository, so you need to add them to a private repository first. You could use Nexus, Artifactory or another private repo, or you can simply install the jars locally, which is what I did.
Ideally, you would need 2 things to get started:
- SDL Web 8.5:
- An install-maven.bat file to install the private jars in your local Maven repo
- A pom.xml with all the correct references, or even a complete project folder with a pom.xml inside it
- Tridion 9:
- An install-maven.bat file to install the private jars in your local Maven repo
- A pom.xml with all the correct references
Lucky for you, I created those things. Click on the links and download. Just be careful: always make sure you are on the latest hotfix. The bat file and pom.xml that I provided are based on the latest hotfixes for SDL Web 8.5 and Tridion 9, respectively – at the time of writing (April 2019). Normally, it wouldn’t really hurt if you build your code against slightly different versions of all these jar files, but the devil is in the details and better safe than sorry, and all that.
So, now that you have the install-maven.bat file, how do you run it? Well, first go to the folder where your deployer microservice is installed, and copy all the jar files you find in there to a single work folder (look in the lib folder and all the subfolders of the services folder). Copy the install-maven.bat file to that same work folder and run it from there. It will install all the private jars in your local Maven repository (the .m2 folder in your Windows user profile).
From the pom.xml, you can create a project in your favourite IDE. I’m using IntelliJ myself. You will need to change the groupId and artifactId, of course, and whatever else you feel you need to change. Just keep the dependencies and plugins or it won’t work.
Configuration files
The deployer requires a number of configuration files to run. I’m not going to explain what they all do, because that is documented here. I normally start by copying the config files of a deployer service that is already running somewhere, like on your development environment.
You need to copy these files into your project. Make sure the folder that contains them is on your classpath. By default, a Maven project uses a folder called resources for this purpose. If you want to use a different name (like ‘config’), just add a reference to the POM, inside the <build> element, like this:
<build>
  ...
  <resources>
    <resource>
      <directory>config</directory>
    </resource>
  </resources>
</build>
This is what I did in the example project.
When you decide to copy config files over from a server, please make sure that all the references to your local file system are set correctly (like the <License> elements in cd_storage_conf.xml and deployer-conf.xml, or the paths in logback.xml). Also make sure that the DataSource elements in the cd_storage_conf.xml and deployer-conf.xml point to URLs that are accessible from your local machine.
Don’t forget to change your configuration so that your custom code will run. For example, if you are developing a custom deployer module, change the deployer-conf.xml file to include a Step, like this:
<Step Id="PageDeployCustom" Factory="com.sdl.delivery.deployer.steps.TridionExecutableStepFactory">
  <Module Class="com.tridion.acme.deployer.modules.CustomPageModule" Type="PageDeploy">
    <Configuration Enabled="true"/>
  </Module>
</Step>
Likewise, if you are creating a custom storage DAO class, change your cd_storage_conf.xml like this:
<StorageBindings>
  <Bundle src="custom_bundle.xml"/>
</StorageBindings>
Next, add a file called custom_bundle.xml to your config (or resources) folder. It may look like this:
<?xml version="1.0" encoding="UTF-8"?>
<StorageDAOBundles>
  <StorageDAOBundle type="persistence">
    <StorageDAO typeMapping="ComponentPresentation" class="com.tridion.storage.extension.dao.MyDAO"/>
  </StorageDAOBundle>
</StorageDAOBundles>
Running the project
Once your project compiles correctly and the configuration is in place, you are ready to run it. I will provide the instructions for IntelliJ, if you use Eclipse or another IDE, you can hopefully take enough pointers from this info to get it to work.
Click on the Edit configurations button in the top right corner. Click the + sign at the top of the popup to add a new configuration, and choose the category ‘Application’.
Give the configuration a name, like Run Deployer. The important fields to fill out here, are:
- Main class: com.sdl.delivery.service.ServiceContainer
- Program arguments: –server.port=8089 –server.max-http-header-size=65536
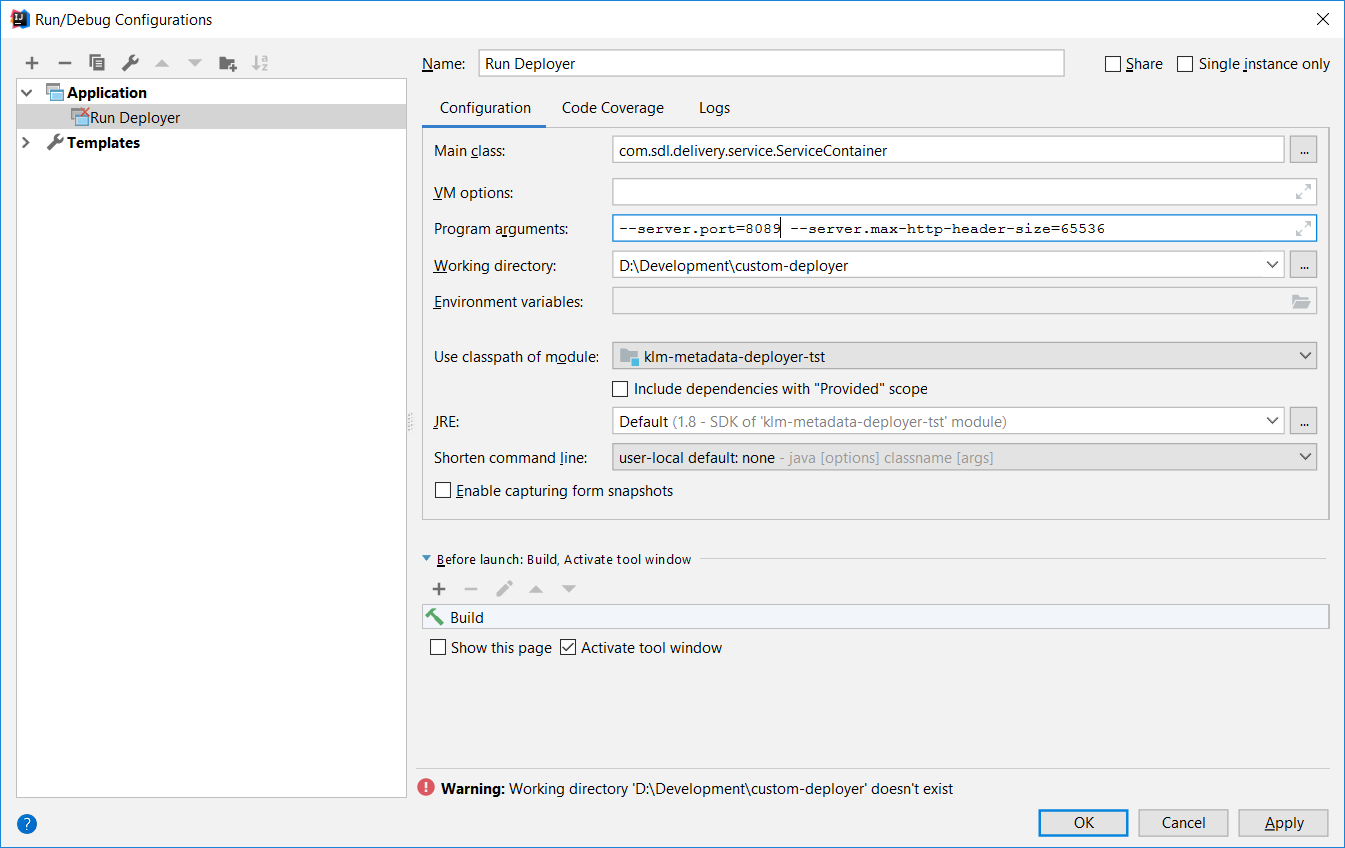
Note the port (8089) here. This is the standard port for the deployer worker. If you are developing on a server that has the CD stack installed, this may cause problems. In that case, just pick any free port.
Click OK to save the run configuration.
Now you can run the deployer by selecting your new run configuration from the dropdown menu at the top right of your screen.
You are successful if log files are created and the cd_core log contains the message “CD service container started”.
Triggering the deployer
It is possible (good practice, in fact) to develop deployer extensions on a machine that does not have the Tridion CD stack installed. In that case, you need to find a way to kick the deployer into action. Normally, a deployer is triggered by the Tridion publishing process, but this won’t work if you are running your IDE on your local workstation.
Fortunately, there is an easy way to trigger the deployer.
First, you need to get hold of two things:
- A publish package (aka transport package)
- A queue command (JSON file)
To obtain a publish package, you should intercept a package that is being published by a real Tridion system (e.g. on your development server). Not only does this guarantee that the package has the correct format for your implementation, it also allows you to publish specific content that your custom extension expects. For example, if you are writing a storage DAO that requires certain metadata to be present on a content item, you can make sure this metadata is in the package.
To intercept a package, you must change the cleanup setting of the deployer to false. Open the deployer-conf.xml file (it’s in <DEPLOYER HOME>/config). Look for the Workers element inside the Queues element, and make sure it has a Property child element like this:
<Workers>
    <Property Name="Cleanup" Value="false"/>
</Workers>
If the Workers element is absent or commented out, just include / uncomment it.
Save the file deployer-conf.xml and restart the deployer service. Publish a page (or something else) and wait for the status to change to success. The publish package will now be in the incoming\Binaries\Success folder (to find the exact location of the incoming folder, check the BinaryStorage element in deployer-conf.xml, which looks like this:
<BinaryStorage Id="PackageStorage" Adapter="FileSystem">
    <Property Name="Path" Value="incoming"/>
</BinaryStorage>
If the path does not start with a slash, it is taken to be relative to the folder where the deployer is installed.
Take the zip file and copy it to your own machine.
Note that the same procedure applies when you unpublish. Just grab an unpublish zip instead of a publish zip. The command file (see next section) is exactly the same.
Creating a queue command file
In previous versions of Tridion, it was enough to simply place a package in the incoming folder. Since SDL Web 8, this is no longer the case. You need to add a ‘command’ file as well. A command file is a JSON file that contains instructions to the deployer. To create one, you need to know the ID of the publish package. You can find this by looking at the file name of the package. It looks like this: tcm_0-486-66560.Content.zip. The second number in this name (486) is the unique ID of the transaction.
Create a text file called tcm_0-<ID>-66560.Content.json (where <ID> is replaced with the unique ID of the transaction, e.g.: tcm_0-486-66560.Content.json).
Put the following string in this file:
{"executionId":"tcm:0-<ID>-66560","verbs":["Content"],"action":"TridionBootstrap","binaryIds":["tcm_0-<ID>-66560.Content.zip"],"properties":{}}
Again, replace <ID> with the unique ID of the transaction, for example:
{"executionId":"tcm:0-486-66560","verbs":["Content"],"action":"TridionBootstrap","binaryIds":["tcm_0-486-66560.Content.zip"],"properties":{}}
You can store both the publish package and the command file for future use. You can re-use them as often as you want.
Warning: the procedure described in this post applies to SDL Web 8.5 and Tridion 9! For SDL Web 8/8.1, things worked in a slightly different way.
Deploying a package
Now we are ready to deploy a real publish package! First, start your application (see above). Wait for it to be started completely (the log file should show ‘CD service container started’ when logback is set to debug).
Check if the incoming folder now has a subfolder called Binaries. If not, create it manually. Copy the publish package to incoming\Binaries.
Check if the queue folder now has a subfolder called ContentQueue. If not, create it manually. Copy the queue command to queue\ContentQueue. If everything is set up correctly, the command file will disappear within a few seconds. This means that it is being processed. Check the cd_core log to see what’s going on.
The deployer will now process the package. It will unzip it in the Binaries\Zip folder. If you have any custom storage extension or deployer module configured, it will now be loaded and activated.
If you are running in debug mode, breakpoints in your code will now be hit. You’re able to develop efficiently now.