Inside DD4T: templates without metadata

If you’re using DD4T, you know that you have to assign metadata to your templates. It is through this metadata that DD4T knows which view to use to render a given page or component presentation.

Now, DD4T can also work without metadata on templates. How? Simple: by using a naming convention. Just give your view the same name as your template, and you’re done.  This is in line with the ‘convention over configuration’ mechanism which is embraced by the MVC world.

There is one caveat: if your template name contains spaces, these are removed before looking up the view. So if your page template is called ‘Standard Mobile’, the file containing the view should be named ‘StandardMobile.cshtml’.

Of course, the good old metadata still works, and will continue to be supported as a way to override the default.


Keep those publish transactions down!

One recurring complaint from Tridion users is the publishing queue. It can be very slow to view it, and sometimes the performance becomes so bad that publishing itself will fail. A symptom of this is that items stay in the queue with the status ‘Waiting for publish’ even though the publisher is running.

Often, all these symptoms have one common cause: the publish transactions table in the database has grown too big. Tridion has no built-in clean-up mechanism for this table, so you have to do some work.

The solution is quite easy: run the Purge Tool regularly. It is installed with the Tridion content manager, so everyone should have it. When you start it, it shows you a window with some options. You can use it to purge old versions of components, pages and other items, to purge workflow histories, as well as purge the publish transactions table.

Of course you can simply run this tool every day, but fortunately there is a command line mode. It is configurable through an XML file (see http://sdllivecontent.sdl.com/LiveContent/content/en-US/SDL_Tridion_2011_SPONE/idheading-259253576, login required). Using this XML and a simple bat file you can schedule the purge tool to run every night, and let it remove all publish transactions that are older than say 2 days. You do this with the following XML snippet:

<PublishTransactions Purge="true" Before="2012-09-18" />

There is only one problem with this: the ‘before’ date in the XML must be an absolute date. It would be nicer if SDL would have let us specify a date OFFSET instead, like ‘2 days ago’.

I solved this by writing a simple vbscript that updates the config file and sets the Before date to ‘2 days ago’. My batch file calls this script first, and then the purge tool. The batch file is scheduled to run every night through the Windows task scheduler.

I know many Tridion administrators have come up with this solution, or something similar (better?) already. But since I couldn’t find any of this online, I thought I’d post it here.

Installation instructions:

– Unzip

– Move files to a location of your choice on a Tridion CM server

– Schedule the file RunPurgeTool.bat every night (or as often as you like)

To download: RunPurgeTool.


Note: with slight modification, you can use the tool to maintain workflow histories and/or old versions of versionable items.


JMS: the nitty gritty

In a previous post I explained why using JMS instead of Tridion’s Cache Channel Service is a good idea. Now I will get down to earth and show you how to actually implement it. I’ve picked Apache’s ActiveMQ as JMS server, mostly because it’s free and it works well on Windows. I’m assuming you have Tridion running, with a deployer and a web server which you have configured separately. If your deployer and web site share the same Tridion configuration files, you will not be able to configure JMS successfully! This is because – as you will see – the deployer requires a slightly different storage configuration than the web site. Check the Tridion documentation to see how this can be done.

The architecture looks basically like this:
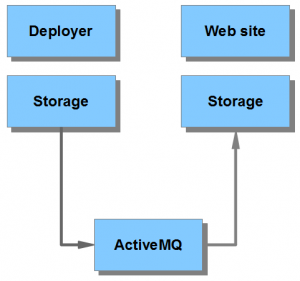
JMS

The installation consists of the following tasks:

  1. Install ActiveMQ
  2. Change storage configuration of the deployer
  3. Change storage configuration of the web site

1. Installing ActiveMQ

First, download the latest release from http://activemq.apache.org/download.html. In my case, that was ActiveMQ 5.6.0. The software is distributed as a zip file.

Next, unzip the file in a location of your choice. It will create a folder called apache-activemq-5.6.0 (or whatever the version is). Note: it is not an installer, it is the actual server, so you may want to put it in C:\Program Files or something.

Go to apache-activemq-5.6.0\bin\win64 and double click on InstallService.bat.

Go to the services panel. You should now see a service called ‘ActiveMQ’. Start it.

That’s all there is to it. Actually, there are many configuration options for ActiveMQ, but the default config seems to work fine with Tridion.


2. Configure the deployer

The Tridion deployer must have an ActiveMQ client installed. The client consists of a number of jar files that can be found in the ActiveMQ folder, under lib. Simply take every jar file in that folder, except slf4j, to Tridion’s lib folder. Slf4j is already installed by Tridion.

You could also use a file called activemq-all-X.X.X.jar, which sits in the root of the ActiveMQ zip that you just downloaded. However, when I did that, the Tridion logging stopped working because of a conflict between log4j versions!

Next, look for the cd_storage_conf.xml and open it in an editor.  You must add a RemoteSynchronization element inside the ObjectCache element like this:

<RemoteSynchronization Queuesize="512">
  <Connector Class="com.tridion.cache.JMSCacheChannelConnector" Topic="Tridion" Strategy="AsyncJMS11">
    <JndiContext>
      <Property Name="java.naming.factory.initial" Value="org.apache.activemq.jndi.ActiveMQInitialContextFactory"/>
      <Property Name="java.naming.provider.url" Value="tcp://SERVER:PORT?soTimeout=5000"/>
      <Property Name="topic.Tridion" Value="TOPIC NAME"/>
    </JndiContext>
  </Connector>
</RemoteSynchronization>

The SERVER is of course the machine where you installed your JMS server. The PORT is the port it’s listening to (defaults to 61616). The TOPIC NAME can be any string. It identifies the ‘queue’ you plan to use. Make sure the deployer uses the same topic name as the web server to which it deploys.

Note that JMS can work with different strategies. They differ in the delivery method (synchronous or – more commonly – asynchronous), the JMS version (1.0 or 1.1) and whether or not they operate within a J2EE environment using Message Driven Beans (you may run into this if you use a JMS service within Websphere, for example).

Tridion’s default strategy is AsyncJMS11. See the Tridion documentation for more information on JMS strategies.

Restart the deployer service to activate the changes. In case of in-process deployment you must restart IIS.


3. Configure the web site

The web site needs the same ActiveMQ client  as the deployer, so start by copying those jars to the Tridion lib folder again. The lib folder, by the way, is normally found inside the bin folder of your web application (on .NET) or in the WEB-INF (on Java).

Next up is the cd_storage_conf.xml. It requires usually the same change as the deployer’s storage configuration.

<RemoteSynchronization Queuesize="512">
  <Connector Class="com.tridion.cache.JMSCacheChannelConnector" Topic="Tridion" Strategy="AsyncJMS11">
    <JndiContext>
      <Property Name="java.naming.factory.initial" Value="org.apache.activemq.jndi.ActiveMQInitialContextFactory"/>
      <Property Name="java.naming.provider.url" Value="tcp://SERVER:PORT?soTimeout=5000"/>
      <Property Name="topic.Tridion" Value="TOPIC NAME"/>
    </JndiContext>
  </Connector>
</RemoteSynchronization>
Note that the strategy in the web application can never be set to AsyncJMS10MDB or AsyncJMS11MDB, since message driven beans can only be used for sending messages, not for receiving them.

Restart the web site to activate the changes.

Put it to the test

That’s it. Try it by publishing some content. Be sure to check the cd_core log for exceptions. If you have made a mistake in the configuration, it will normally show up in there.
If you want to learn more about ActiveMQ, check out their web site, or read this blog post by Christian Posta.  Or you can just be satisfied that it works, like I was.

Tridion and JMS: removing another SPOF

When you use Tridion’s content delivery API to retrieve dynamic content, resolve links, etcetera, you are well advised to use the built-in caching mechanism. Without it, every page request would result in dozens of queries on your broker database (or dozens of data files being opened, which is just as bad for performance). With caching, most requests can be handled completely from memory, which makes your site a lot faster.

There is one catch to caching: Tridion being a content management system, it is highly likely that the content and links will change from time to time. That is why Tridion offers a notification system, so that your web application will always show content which is up to date and links that lead to the correct destination.

Actually, Tridion offers not one such notification system, but two. Most implementations use the so-called Cache Channel Service. This is a proprietary service which runs as a windows service or a stand-alone java process. Its job is to notify the broker instances when a new version of an item has been published to the broker repository. The Cache Channel Service uses the RMI protocol to communicate between the different virtual machines (which contain the broker instances).

Although this is certainly the most popular notification mechanism, it has some drawbacks:

  • RMI is not a messaging protocol, so things might go wrong when the Cache Channel Service is temporarily down. Fortunately, Tridion has solved this by some clever programming in the broker, but it is still a work-around which makes the CCS slightly unstable at times.
  • RMI uses unpredictable ports, which means that all ports > 1024 must be open between all your machines running a Tridion broker and the one running the CCS.
  • There is no easy way to handle multiple channels (like a staging site, a live site, a mobile site, development environments, etc). You can only achieve this by running more than one CCS instance, which means running multiple processes, each on a different port, or even running the CCS on multiple machines.
  • The CCS is a single point of failure (SPOF), since it cannot be scaled up.

As a solution architect, I find these disadvantages quite unsettling. Especially the last one: removing single points of failure from a solution is what we architects drool over.

Fortunately, SDL has come up with an alternative notification system. Instead of installing the CCS, you can also install a JMS instance. JMS – Java Message Service – is Java’s messaging system. There are many implementations available, including free ones like Apache’s ActiveMQ.

JMS is designed to pass messages from one application to another. These messages are organized in containers called ‘topics’. Applications can subscribe to a topic. Whenever a message becomes available in this topic, it will be passed on to all subscribing applications.

JMS addresses each of the problems of the Cache Channel Service mentioned above:

  • JMS can work over http on a fixed port (typically 61616, but it can be configured to run on any port including 80)
  • Multiple channels can be accommodated on a single JMS instance by simply configuring extra topics
  • Since JMS works on http, it can easily be accessed through a load balancer. This removes the single point of failure from the architecture.
There is a common idea about JMS, and that is that it would be unsuited for a .NET presentation stack. This idea is incorrect. I can guarantee that the solution will work just as fine if your web site is on IIS. After all, the content broker core is always Java, and it is this core that does the communication through JMS.

Where’s the catch then? Well, there isn’t any, other than the lack of awareness of this solution in the Tridion community, and the lack of configuration examples in Tridion’s product documentation. But with some perseverance, the help of this excellent post by Julian Wraith and – if necessary – the assistance of Tridion customer support, it can certainly be done. The end result is a more stable and more robust solution.

Mixing content and functionality with DD4T

Today I received a question from a developer who is just starting on DD4T. He wants to have a page which consists of regular Tridion content but also contains a form. Being a .NET MVC developer he naturally wants to handle this form with a controller and various  actions to handle GET and POST and perform validation as well as sending an email on successful submission.

I call this type of web page, which combines plain content with application logic, a ‘mixed’ or ‘hybrid’ page. DD4T was designed to handle such pages (as well as the more simple content pages). To understand how DD4T does this, you need to know that the framework uses controllers and actions on two different levels:

  • The level of the page (just like in any MVC app)
  • The level of the component presentation

Let’s start by looking at a very simple page, which does NOT contain any forms or other application logic:


As you see, there are two views involved to build this rather simple page. The controller and action are predefined by the framework – unless you override them, which I will explain later. The controller/action for the page retrieves the page from the Tridion broker and uses that as its model. The controller/action for the component uses the component as its model. All YOU need to do is write the views.

You may wonder how DD4T knows which views to call. This is achieved by configuring the name of the view in the metadata of the page template and component template.

Now I’m coming back to the question of mixed pages. A mixed page has application logic as well as plain content. To handle application logic in MVC, you need a controller and an action. For example: you might want to display a form when the method is GET, and validate it when the method is POST.

In a diagram, this is how it will look:

The page now contains two component presentations: one that represents (and contains) just plain content and another one that represents the form. The neat thing is that your custom action will automatically be called by DD4T. All you need to do is configure your custom controller and action using metadata on the component template. So instead of just specifying a view, you will now have to specify a controller and action as well.

Advantages of this ‘mixed page’ approach:

  • Tridion stays in control of the URL
  • Editors can decide where to put a form, and which other pieces of content to put next to it
  • The placement of the form and other pieces of content is handled by the exact same view as on normal pages, so you do not have to do extra coding.
  • All MVC functionality like model binding and validation are fully supported

Happy coding!