
The introduction of Tridion Access Management in Tridion 9.5 has changed the way you need to create a core service client. Spoiler alert: it has become a lot more complicated, especially if you need a session-aware client.
In this blogpost I will take you through the steps.
Types of clients
Tridion comes with two different clients that allow you to connect to the core service:
- ICoreService
- ISessionAwareCoreService
Both clients typically use a system account (non-personal account if you wish) to identify themselves. If you leave it out, the current (Windows) user is used. On top of this, the ISessionAwareCoreService client has an Impersonate method, which allows you to take on the identity of another user when interacting with Tridion.
Both the system account and the impersonated account must be trustees in Tridion, unless you are using the ISessionAwareCoreService client, in which case the system account could also be a Windows user which is marked as an impersonation user in the Tridion MMC snap-in.
So far what we already knew.
But now we have Access Management. This is a relatively new part of the Tridion product. If you use it, the Tridion “core” delegates all matters regarding authentication to this separate service. Access Management allows you to authenticate and authorized users based on a number of identity providers, like Azure Entra ID (formerly known as Azure Active Directory), LDAP, Auth0, etc.
And yes, it is even possible to use Windows as an identity provider. But note that – even in this scenario – it is no longer the Tridion core (service) which performs the authentication. It is always handled by Access Management.
Creating an ICoreService client
So how should we create an ICoreService client in this new world? Fortunately, this has been documented.
Short summary:
- Create a service account in Access Management
- Use the IdentityModel NuGet package to retrieve an access token
- Add an endpoint behavior to every request which passes the access token to the server
An excellent code example is given in the documentation.
Note that the service account would typically have administrator rights. That makes this type of core service client suitable for all kinds of housekeeping tasks, integrations, etc.
But if you would like to create an application where everybody can log in with their own Tridion account, and receive the rights and permissions that go with that account, you need a different approach. You would need an ISessionAwareCoreService client. Unfortunately, the documentation on this topic is totally inadequate.
Still, for a recent project this is exactly what I had to do.
Creating an ISessionAwareCoreService client
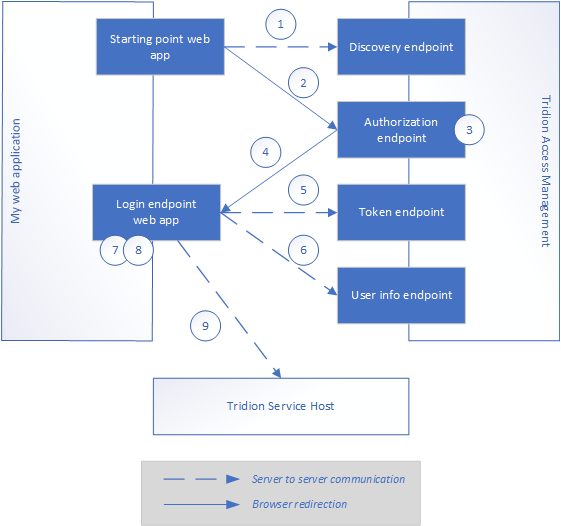
Creating a client on behalf of a user of your web application is a lot more complicated than it used to be. In short, the steps are:
- Your application retrieves general information about the access management process (authorization endpoint, token endpoint, user info endpoint, etc)
- Your application directs the browser to the authorization endpoint
- Access Management lets the user authenticate themselves (this is done outside the scope of your application)
- The Access Management service sends the user back to the configured returnUri (which is part of your application, more on that later), with a code as a parameter
- Your application sends this code to the token endpoint and receives an access token
- Your application sends this access token to the user info endpoint and receives a set of claims
- The application adds some extra claims (this is fully undocumented voodoo, more about that later)
- The application creates a session aware client in the same way as you would create a regular ICoreService client (see documentation)
- On this client, you call the ImpersonateWithClaims method, passing the claims you retrieved in step 6 + 7
Now, you have a core service client which impersonates the current user.
Register your application in TAM
Before the introduction of Tridion Access Management (TAM), it was a common practice to host your custom web application inside the Tridion Content Manager web app. That way, users would automatically be logged in with the correct Windows identity.
This does not work anymore when you use TAM. We recommend to move your custom webapps to a separate IIS site with anonymous authentication only, to avoid complications.
Before you can start, you have to register your application like this:
- Log in to TAM
- Click on the Applications tab
- Click on the Register application button
- You will see the following fields:
- ClientID: don’t change, but copy the value somewhere
- Name: a meaningful name for your application
- Allowed authentication flow type: AuthorizationCode
- Allowed redirect URIs: the URL of your application. Specifically, this should be the URL that handles the login.
You can add more than one. For development purposes, I recommend to add the URL of your local development environment as well (e.g. http://localhost:12345/Login if you are using IIS Express in Visual Studio for debugging). You can also come back later and add more URLs.
- Save
Now that you have a clientId for your app, you can focus your attention on the application itself.
Modify identity provider
Now that you have your own TAM application, you need to make sure the prospective users have access to it. For this, you must edit the identity provider. Find the group(s) you want, and tick the checkbox for your new application.
Creating a session-aware client – step by step
| 1 | Create an ASP.NET MVC web application I’m using .NET Framework 4.8 but it can be done with more recent .NET versions also |
| 2 | Add a reference to the Tridion.ContentManager.CoreService.Client.dll (available in the Tridion installation, in bin\client\CoreService) |
| 3 | Create a controller with an action that listens to the return URI which you supplied when you registered the application. The method must be marked with ‘async’ and must accept a parameter of type string. E.g.:
public async Task<ActionResult> Login(string code)
{
  // implementation goes here
}
|
| 4 | Next, go to the action method where you need a core service client. Note: although you may need this client somewhere deeper in your code (in a service class, for example), I recommend creating it in the action method, so you can easily redirect back as soon as the session has been created (more about this later).
You can then pass the client to the service(s) that need them. |
| 5 | Create a cookie containing the current URL of the app. For example:
HttpCookie cookie =
   new HttpCookie("RedirectToPath") { Value = "/" };
HttpContext.Current.Response.Cookies.Add(cookie);
|
| 6 | Add the following settings to your app (e.g. by adding them to the appSettings section of the web.config):
|
| 7 | Use a regular HttpClient to retrieve the TAM discovery document. The URL can be found by adding /.well-known/openid-configuration” to the TAM URL. For example: http://access.mytridion.com/access-management/.well-known/openid-configuration.
This will return a JSON-formatted object with all the information needed to perform the authentication. It will look like this: {
"issuer": "http://access.mytridion.com/access-management",
"authorization_endpoint": "http://access.mytridion.com/access-management/connect/authorize",
"token_endpoint": "http://access.mytridion.com/access-management/connect/token",
"userinfo_endpoint": "http://access.mytridion.com/access-management/connect/userinfo",
// etc
}
|
| 8 | Capture the settings you need. The simplest way is to parse the JSON string into a NewtonSoft JObject. Note that you only need three settings: authorization_endpoint, token_endpoint and userinfo_endpoint.
Example: var client = new HttpClient();
var response = client.GetAsync(issuer + "/.well-known/openid-configuration").Result;
if (response.IsSuccessStatusCode)
{
string responseString = response.Content.ReadAsStringAsync().Result;
JObject responseJson = JObject.Parse(responseString);
authorizationEndpoint = responseJson["authorization_endpoint"].ToString();
tokenEndpoint = responseJson["token_endpoint"].ToString();
userInfoEndpoint = responseJson["userinfo_endpoint"].ToString();
}
|
| 9 | You can now construct the login url. Take the authorization endpoint and add the following parameters:
Don’t forget to encode the URL. It would look like this: http://access.mytridion.com/access-management/connect/authorize?client_id=98c5f19b-317f-4178-b088-2b6721681be6&response_type=code&redirect_uri=https://localhost:44356/OIDC/Login&scope=openid%20profile%20role%20forwarded |
| 10 | You must now make sure that the browser is redirected to this url. There are 2 ways to do this:
This code allows you to choose your favorite approach: public string LoginUrl =>
$"{authorizationEndpoint}?client_id={clientId}&response_type=code&redirect_uri=
{redirectUri}&scope=openid%20profile%20role%20forwarded";
public string LoginJavaScript => $"<script>location.href='{LoginUrl}'</script>";
|
| 11 | Send the HTML back to the browser like this:
return Content(LoginJavaScript); The user is now redirected to TAM, where they are authenticated. Note: if they are not authenticated, they are never redirected back! |
| 12 | After successful authentication, the browser is redirected to the returnUri (in our example: http://localhost:12345/Login), with a parameter named ‘code’. This contains a unique string, which looks like this: ‘3E815C215F0D28ADC7E8809E35568A48339341E0C42E71DBC99C894EF627662F-1’.
Create a dictionary like this (using the ClientId and RedirectUri you configured earlier, plus the code that is passed into your login method: var values = new Dictionary<string, string>
{
{ "grant_type", "authorization_code" },
{ "client_id", ClientId},
{ "code" , code },
{ "redirect_uri", RedirectUri}
};
|
| 13 | Post this dictionary to the token_endpoint you retrieved earlier and parse the JSON response into a JObject:
HttpClient tokenClient = new HttpClient(); var content = new FormUrlEncodedContent(values); var responseMessage = tokenClient.PostAsync(_context.TokenEndpoint, content).Result; var json = await responseMessage.Content.ReadAsStringAsync(); JObject response = JObject.Parse(json); |
| 14 | You only need two values from the returned JSON: access_token and expires_in. Note that expires_in contains a date, not a string. You need it if you want to keep the session alive for a while (which I won’t do in this blog, because it is long enough as it is..) |
| 15 | We now have an access token, which we’ll use to retrieve a set of claims from the user info endpoint. You need to add the access token as authorization header preceded by the string “Bearer “, like this:
HttpClient httpClient = new HttpClient();
httpClient.DefaultRequestHeaders.Add("Authorization", $"Bearer {accessToken}");
|
| 16 | You can now perform a GET request to retrieve the user info endpoint (without any additional parameters):
httpClient.DefaultRequestHeaders.Add("Authorization", $"Bearer {accessToken}");

var responseMessage = httpClient.GetAsync(_context.UserInfoEndpoint).Result;
var json = await responseMessage.Content.ReadAsStringAsync();
JObject response = JObject.Parse(json);
|
| 17 | This will give you a set of claims, like this:
{
  "user_id": "5",
  "name": "TRIDION\\johndoe",
  "role": [
    "Tridion.ContentManager.Administrator",
    "Tridion.ContentManager.User"
  ],
  "sub": "TRIDION\\johndoe"
}
|
| 18 | Note that some claims have a simple string as a value while others have an array of strings. You have to convert this to a flat list of ClaimData objects. This can be achieved like this:
var claims = new List<ClaimData>();
foreach (var prop in response)
{
  string key = prop.Key;
  JToken value = prop.Value;
  if (value.Type == JTokenType.Array)
  {
    foreach (var ctoken in value.Children())
    {
      claims.Add(new ClaimData() { Type = key, Value = ctoken.Value<string>() });
    }
  }
  else
  {
    claims.Add(new ClaimData() { Type = key, Value = value.Value<string>() });
  }
}
|
| 19 | As if all this wasn’t complicated enough, you now need to add some claims manually!
Thanks to Rick Pannekoek for helping out with this! |
| 20 | Create a SessionAwareCoreServiceClient (either via code or via configuration). You don’t need to supply any credentials. Also, be sure to use the WSHttpBinding, otherwise the session-aware client won’t work*.
I typically use a factory class to construct the client from code, but you can also copy all the required configuration into your web.config and simply construct the client like this: var client = new SessionAwareCoreServiceClient("wsHttp");
|
| 21 | Call the ImpersonateWithClaims method, passing in an array of claims like this:
client.ImpersonateWithClaims(claims.ToArray()); |
You now have a session-aware core service client ready for use.
* Footnote
If your Tridion instance is running on https, please make sure to use a WsHttpBinding with the Security mode set to TransportWithMessageCredential. Do NOT set a Message or Transport property within the Security property, or you’ll get errors.
I use this bit of code to construct the binding in case Tridion is running on https:
private static Binding GetSecureWsHttpBinding()
{
  return new WSHttpBinding()
  {
    MaxReceivedMessageSize = (long)int.MaxValue,
    ReaderQuotas = new XmlDictionaryReaderQuotas()
    {
      MaxStringContentLength = int.MaxValue,
      MaxArrayLength = int.MaxValue
    },
    SendTimeout = new TimeSpan(0, 15, 0),
    OpenTimeout = new TimeSpan(0, 15, 0),
    CloseTimeout = new TimeSpan(0, 15, 0),
    ReceiveTimeout = new TimeSpan(0, 15, 0),
    Security = new WSHttpSecurity()
    {
      Mode = SecurityMode.TransportWithMessageCredential
    },
    TransactionFlow = true
  };
}